
3D printing works by building objects layer by layer from a digital 3D model, instead of cutting material away like traditional machining. It turns virtual designs into physical parts using plastic, resin, or metal, guided by software that slices the model into hundreds or thousands of thin cross-sections.
The problem 3D printing solves
Many industries struggle with slow, expensive, inflexible manufacturing methods. Traditional processes like CNC machining, molding, and casting are optimized for large volumes, but they are painful when you need frequent design changes or small batches.
-
High upfront cost: Tooling for injection molding or casting is expensive and only pays off at high volumes.
-
Limited design freedom: Internal channels, lattice structures, or very complex geometries are difficult or impossible to make conventionally.
-
Long development cycles: Each design change can require new tooling, adding weeks or months to product development.
-
Material waste: Subtractive methods remove a lot of material that ends up as scrap, increasing cost and environmental impact.
Why 3D printing is a solution
3D printing, also called additive manufacturing, addresses these problems by adding material only where it is needed, directly from digital data. This reduces waste, speeds up iteration, and enables shapes that were previously impractical or impossible.
-
Faster prototyping and iteration: Designers can go from CAD file to physical part in hours, enabling many design cycles in a short time.
-
Design freedom: Complex internal channels, organic shapes, and lightweight lattice structures are straightforward for 3D printers.
-
Cost-effective for low volumes: No tooling is required; each part can be different without extra setup cost.
-
Reduced material and energy use: Only the necessary material is deposited, which can use up to most of the raw material in the final part and cut energy use compared with some conventional processes.
Step 1: 3D scanning – capturing reality
3D scanning converts real-world objects or environments into precise digital models that can be edited and printed. This is particularly useful for reverse engineering, custom medical devices, and parts that must match existing geometry.
-
A 3D scanner measures the shape and sometimes color of an object using lasers, structured light, or photogrammetry and generates a point cloud or mesh.
-
The scanned data is cleaned, repaired, and simplified to become a printable 3D model, which can then be modified or combined with CAD features.
Step 2: 3D modeling – designing the part
3D modeling is the process of creating or editing the digital geometry that defines the object to be printed. This can be done from scratch in CAD software or by working on scanned data.
-
CAD tools allow engineers and designers to define exact dimensions, mechanical features, and assemblies, minimizing errors before printing.
-
Once the design is ready, slicing software converts the model into thin layers and generates a toolpath (G-code) that tells the printer where to move and how much material to deposit.
Step 3: 3D printing – building layer by layer
In the printing stage, the machine follows the toolpath to create the physical object layer by layer. Different technologies (FDM, resin-based, powder-bed fusion) use different materials and mechanisms, but they share the same additive principle.
-
Material feeding and preparation: The printer loads material such as thermoplastic filament, liquid resin, or powder and prepares the build platform and print head (for example, heating a nozzle or leveling the bed).
-
Layer deposition or curing:
-
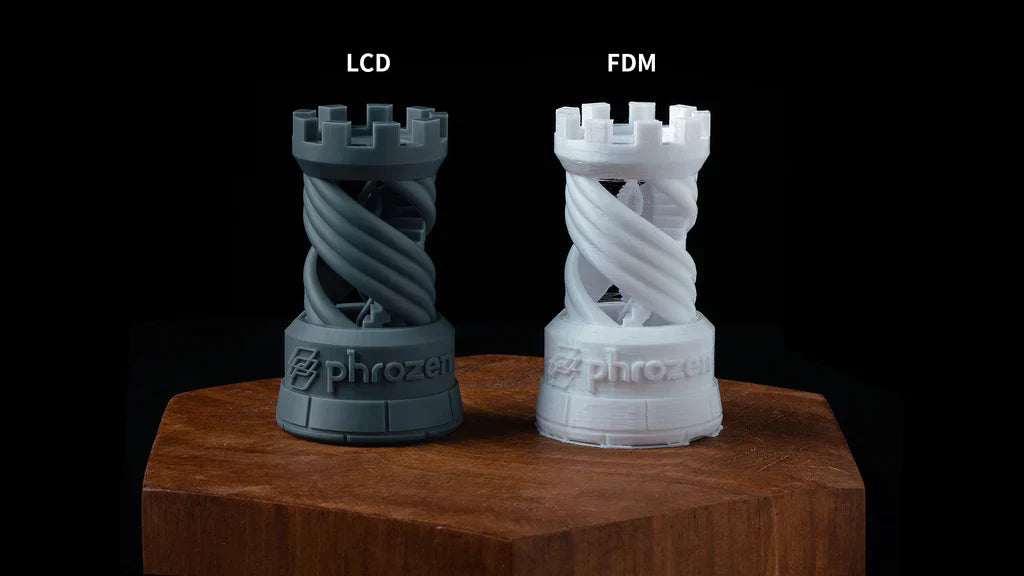
In FDM, the filament is melted and extruded through a nozzle that traces each layer on the build surface.
-
In resin printers (SLA/DLP), UV light selectively cures liquid resin layer by layer around or below a build platform.
-
In powder-bed systems (SLS/metal), a laser or other energy source fuses thin layers of powder according to the cross-section of the part.
-
-
Z-axis movement: After each layer is completed, the platform moves slightly (up or down depending on the system), and the next layer is formed on top.
-
Cooling and post-processing: Once printing is finished, the part may need cooling, support removal, washing, or post-curing, and sometimes sanding or coating for surface finish.
By connecting 3D scanning, 3D modeling, and 3D printing in one workflow, teams can move quickly from physical objects or ideas to tested prototypes and final parts, with high customization and minimal waste.
Contact Us to start your 3D printing journey!

Leave a comment
This site is protected by hCaptcha and the hCaptcha Privacy Policy and Terms of Service apply.